OneSpan Print Driver
Get your important contracts sent for signing even faster – from virtually any application
OneSpan Sign: How to Use the OneSpan Sign Print Driver from OneSpan on Vimeo.
Step-by-step Instructions
Step-by-step Instructions
1) Download the OneSpan Sign Print Driver. Click ‘Get Print Driver’. The OneSpan Sign Print Driver is a free download and it works with all OneSpan Sign plans, including the 30-day free trial.
2) Open the document you would like to send to your signer. The OneSpan Sign Print Driver can be used in documents created in applications like Microsoft Word, Microsoft Excel, Acrobat Reader, or Google Docs. In this example, let’s send an NDA document from Microsoft Word to David Cobb.
3) From the Microsoft Word menu, select ‘File’, then ‘Print’. Once you’ve installed the Print Driver, the option for ‘Send to OneSpan Sign’ will appear on your list of available printers. In the drop-down menu, select ‘Send to OneSpan Sign’. Click the ‘Print’ button to start the process.
4) For your first time use, the Print Driver will prompt you for your OneSpan Sign credentials. You only need to enter your credentials once; the Print Driver will remember your credentials for future use.
5) In the pop-up dialog box enter a name for your transaction. You also have the option to apply a layout to your document which includes pre-defined locations for your signature blocks and data fields within your document. Click the ‘OK’ button to send your document directly to OneSpan Sign.
6) Now that you’re inside the e-signature service, all you need to do is add your signers and select your user authentication methods.
7) You can also add multiple documents to a transaction with the Print Driver. Simply go to the document you want to add to the transaction and follow the same steps illustrated above. In the pop-up dialog box, select ‘Existing transaction’ and click ‘OK’.
8) Have a spreadsheet that needs to get signed? With the Print Driver, your Excel spreadsheet will be automatically converted to a PDF and sent directly to the OneSpan Sign service. Place your signature blocks and click the ‘Send to Sign’ button to send your document to your signer.
FAQ Questions
Is the Print Driver included with my OneSpan Sign account?
Yes! The OneSpan Sign Print Driver is available to all OneSpan Sign customers at no additional cost.
Where can I download the Print Driver?
You can download the Print Driver from our product page.
Which platforms support the Print Driver?
The Print Driver currently supports Windows 10/8/7/Vista/XP
Which apps does the OneSpan Sign support?
The OneSpan Sign Print Driver allows you to send documents directly to OneSpan Sign from any print-enabled Windows application (e.g., Word, Excel, Adobe Reader, Google Docs, Office 365, etc.). If you’re able to print from your application, you can use OneSpan Sign to capture electronic signatures.
OneSpan Sign for Salesforce
Securely send documents for e-signature without ever leaving Salesforce
Step-by-step Instructions
Installation of OneSpan Sign for Salesforce
Read the OneSpan Sign for Salesforce QuickStart Guide for full installation instructions
Using OneSpan Sign for Salesforce
Using OneSpan Sign for Salesforce
- To start, you can access the e-signature capabilities inside of Salesforce from the ‘Transactions’ object at the top of the screen.
Click the ‘New’ button to create the transaction.
- Enter a name for your transaction. Click ‘Next’.
- Next, click the ‘Add Document’ button to add your documents to the transaction. You can use documents already stored in Salesforce or even upload documents from your computer.
- Now it’s time to add your signer. Click the ‘Add Recipient’ button. You have the option to add a contact, user, or a lead from Salesforce. You can even add an external email address.
- Your documents and signers have been added to the transaction. Now it’s time to prepare the document for e-signature. Click the ‘Prepare’ button. The ‘Designer View’ window will appear.
- Drag and drop required signature boxes in the document to indicate where your signers need to sign.
- Close the ‘Designer View’ window then click ‘Send’ to route your transaction for signing.
FAQ Questions
Is OneSpan Sign for Salesforce included with my OneSpan Sign account?
Yes! OneSpan Sign for Salesforce is available to all OneSpan Sign customers. All you need is a OneSpan Sign account and a Salesforce account. Contact our sales team for more information.
Where can I download OneSpan Sign for Salesforce?
You can download OneSpan Sign for Salesforce from the Salesforce AppExchange.
When I send a document for e-signature from Salesforce, will the e-signed transactions along with the Evidence Summary be archived in Salesforce?
Yes! All e-signed documents along with the Evidence Summary will be archived in Salesforce.
Can I use templates for my frequently used documents I send out for e-signature in Salesforce?
Yes! You can use templates for your frequently used documents for e-signature from the ‘Templates’ object in Salesforce.
Does OneSpan Sign also offer an integration with Salesforce CPQ?
Yes! OneSpan Sign for Salesforce CPQ is an extension of the OneSpan Sign for Salesforce app that works with Salesforce CPQ. This app enables users to send their Quote documents for signing with just a few clicks and stores the e-signed documents back within their Salesforce.
OneSpan Sign also integrates with Drawloop and other Salesforce apps to seamlessly deliver a closed-loop process for generating, routing, signing and storing completed documents and associating those with the corresponding Salesforce record. Call us now to get more information on these app at 1-888-745-2647.
There is no charge for both these integrations.
Additional Resources
- OneSpan Sign Products: OneSpan Sign for Salesforce
- Salesforce AppExchange: OneSpan Sign for Salesforce Download
- Documentation: OneSpan Sign for Salesforce – Quick Start Guide
- Documentation: OneSpan Sign for Salesforce Integrator’s Guide
- Salesforce AppExchange: OneSpan Sign for Salesforce CPQ Download
OneSpan Sign for Microsoft Dynamics CRM
Securely send documents for e-signature without ever leaving Microsoft Dynamics CRM
Step-by-step Instructions
Installation of OneSpan Sign for Microsoft Dynamics CRM
Read the OneSpan Sign for Microsoft Dynamics CRM Deployment Guide for full installation instructions
Using OneSpan Sign for Microsoft Dynamics CRM
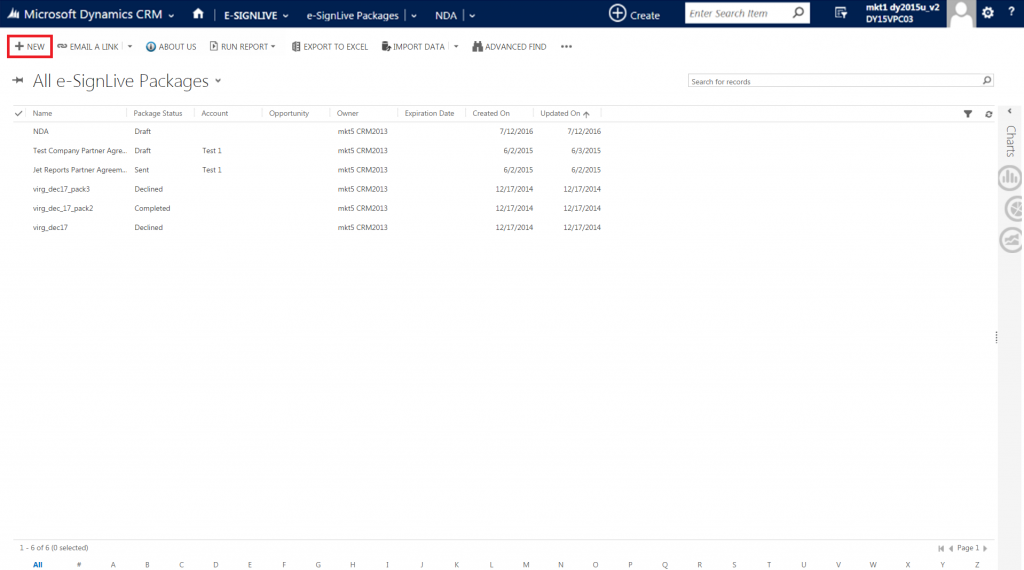
1) To start, you can access the e-signature capabilities inside of Dynamics CRM from the ‘OneSpan Sign Packages’ object at the top of the screen. You can begin the process directly from a specific Account or Opportunity record in Dynamics CRM, or through the Packages object.
Click the ‘+ New’ button to begin preparing the agreement for signing.
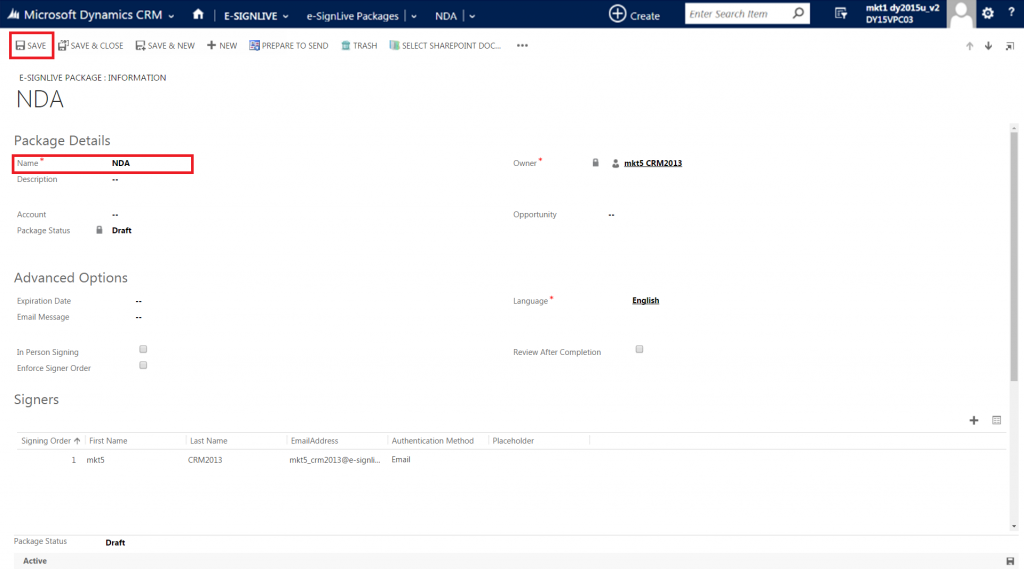
2) Enter a name for your package. Click ‘Save’.
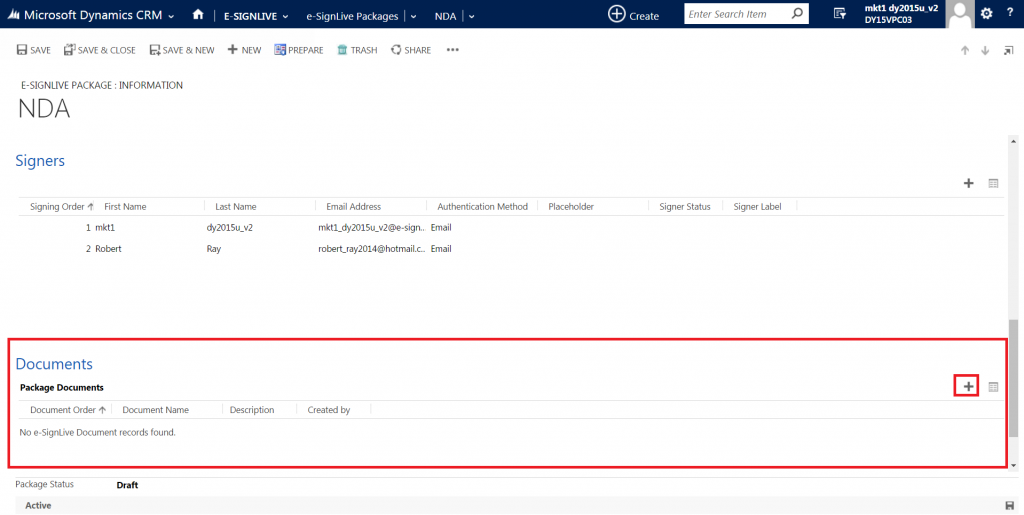
3) Next, add your signers. Click the ‘+’ button in the ‘Signers’ section. You have the option to add a contact, user, or a lead from Dynamics CRM. You can even add an external email address. Click ‘Save & Close’.


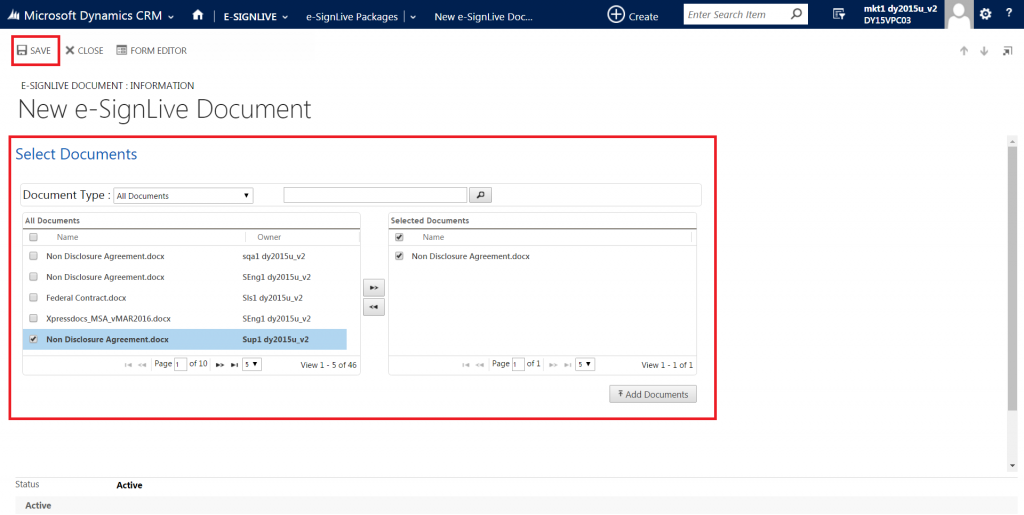
4) Now it’s time to add your documents. Click the ‘+’ button in the ‘Documents’ section to add your documents to the package. You can use documents already stored in Dynamics CRM or even upload documents from your computer. Click ‘Save & Close’.
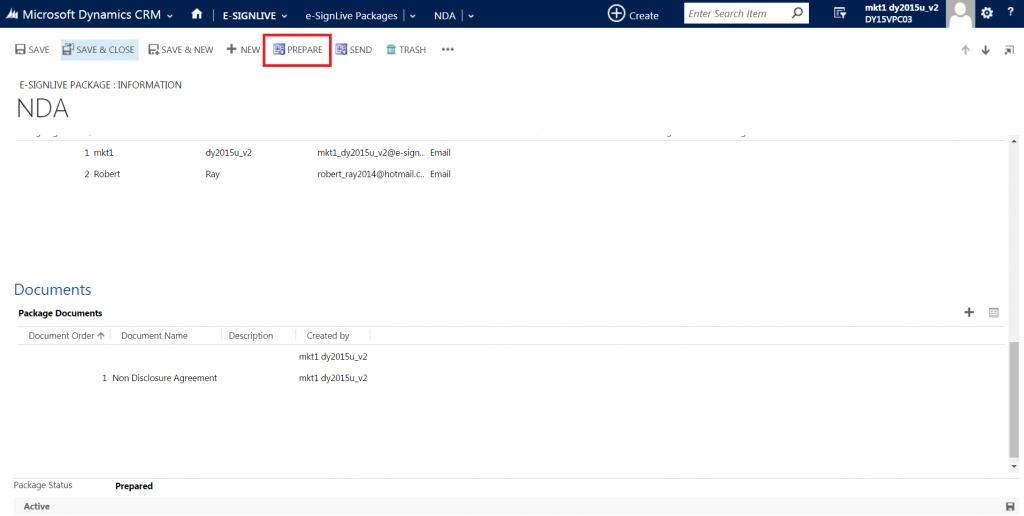
5) Your documents and signers have been added to the package. Now it’s time to prepare the document for e-signature. Click the ‘Prepare’ button. You will be directed to the ‘Designer View’.
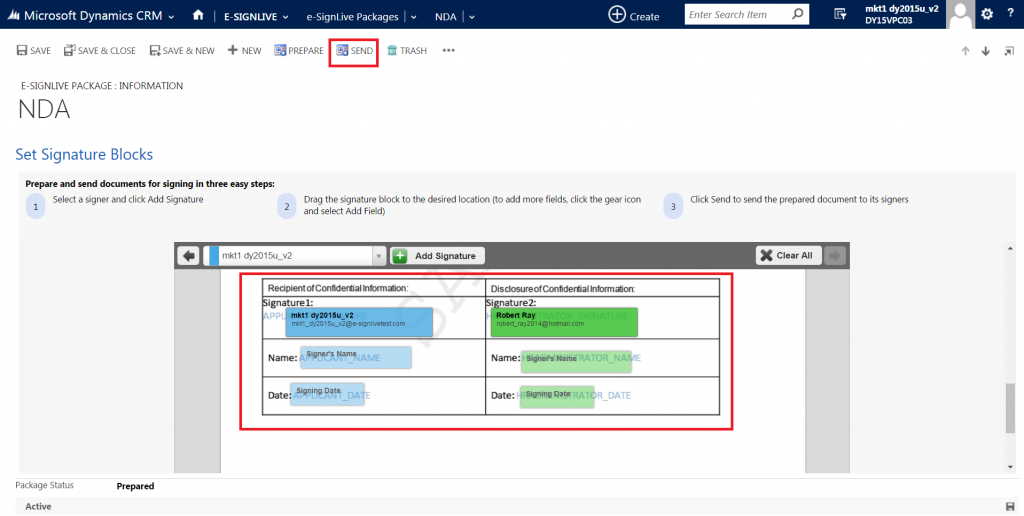
6) Drag and drop required signature boxes in the document to indicate where your signers need to sign. Click ‘Send’.
FAQ Questions
Is OneSpan Sign for Microsoft Dynamics CRM included with my OneSpan Sign account?
Yes! OneSpan Sign for Microsoft Dynamics CRM is available to all OneSpan Sign customers at no additional cost. All you need is an OneSpan Sign account and a Microsoft Dynamics CRM account.
Where can I download OneSpan Sign for Microsoft Dynamics CRM?
You can download OneSpan Sign for Microsoft Dynamics CRM from our website
When I send a document for e-signature from Microsoft Dynamics CRM, will the e-signed transactions along with the Evidence Summary be archived in Dynamics CRM?
Yes! All e-signed documents along with the Evidence Summary will be archived in Microsoft Dynamics CRM.
Can I use templates for my frequently used documents I send out for e-signature in Microsoft Dynamics CRM?
Yes! You can use templates for your frequently used documents for e-signature from Microsoft Dynamics CRM. Follow these detailed instructions to learn how to do this.
Additional Resources
- Products: OneSpan Sign for Microsoft Dynamics CRM
- Documentation: OneSpan Sign for Microsoft Dynamics CRM – Deployment Guide
- Documentation: OneSpan Sign for Microsoft Dynamics CRM – User’s Guide
- Documentation: OneSpan Sign for Microsoft Dynamics CRM – Quick Start Guide
- Documentation: OneSpan Sign for Microsoft Dynamics CRM – Integrator’s Guide
OneSpan Sign for Microsoft SharePoint
Securely send documents for e-signature without ever leaving Microsoft SharePoint
Step-by-step Instructions
Installation of OneSpan Sign for Microsoft SharePoint
Read the OneSpan Sign for Microsoft SharePoint Deployment Guide for full installation instructions
Using OneSpan Sign for Microsoft SharePoint
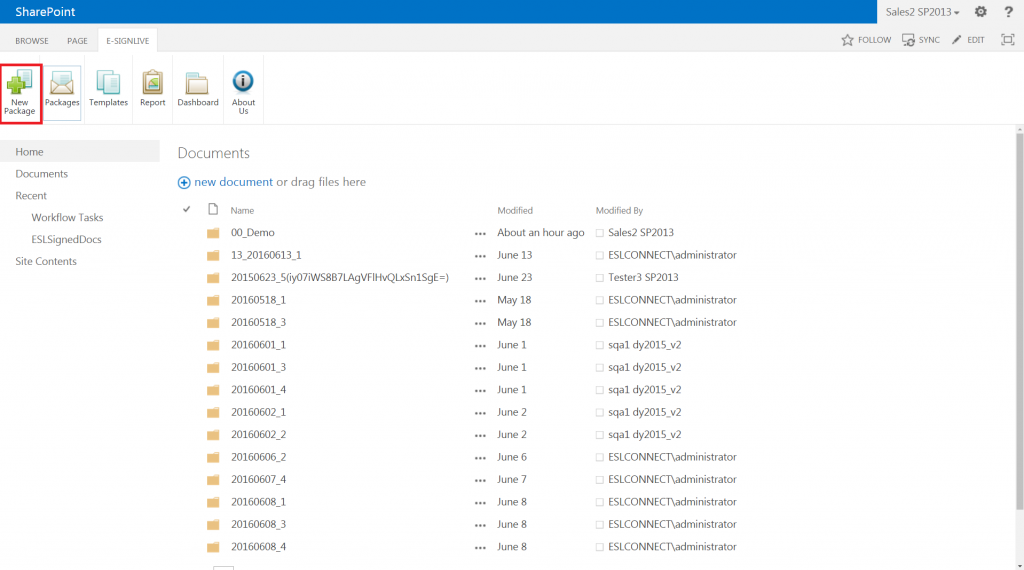
1) To start, go to the OneSpan Sign tab and click ‘New Package’.
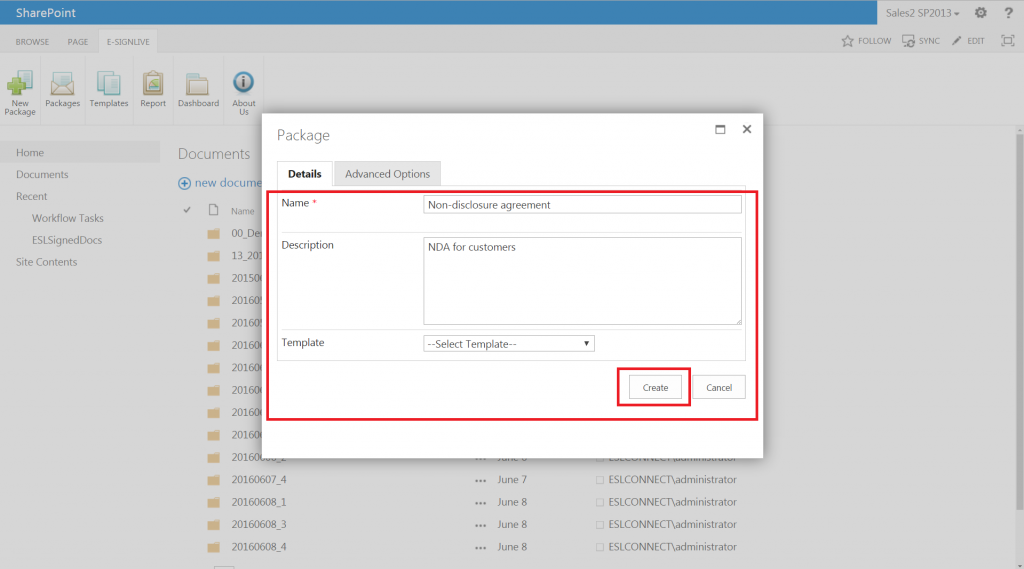
2) Give the package a meaningful name which clearly identifies the contents of the package. Click ‘Create’.
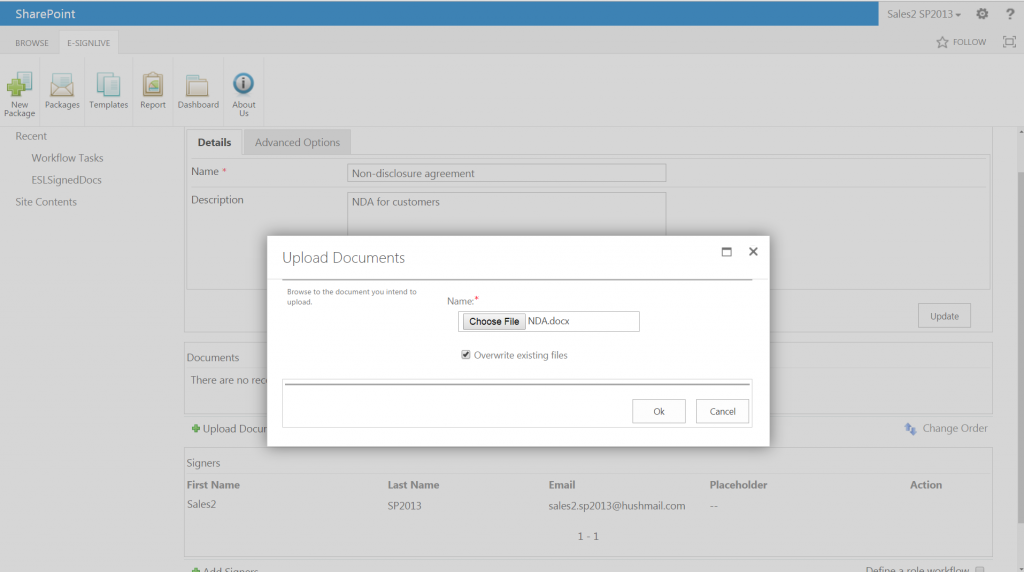
3) Next, add your documents. You have the option to send a document residing in your SharePoint Library or uploading a document. For this example, we’ll upload a document from our computer. Select ‘Upload Document’ then locate the document you want to upload.
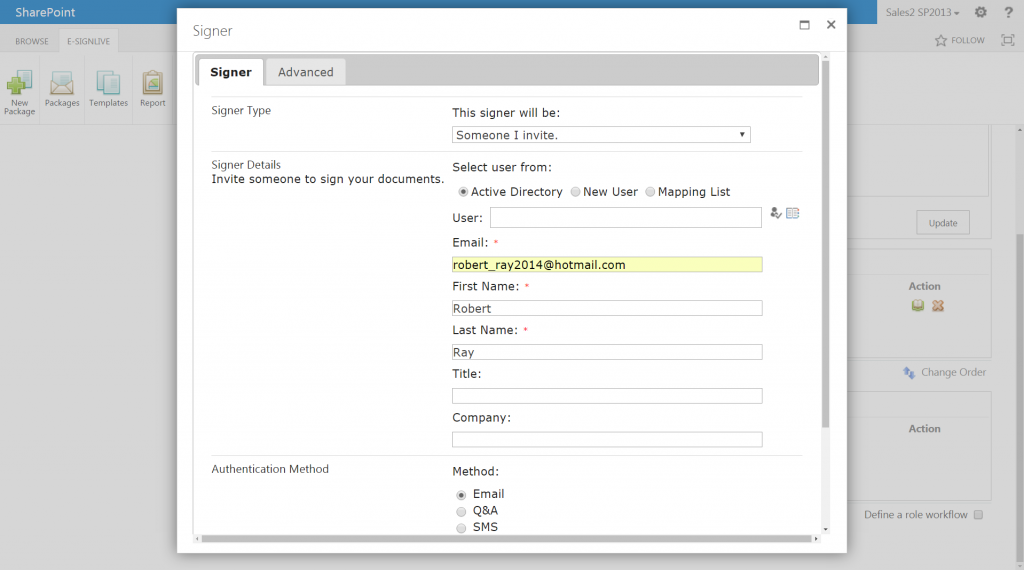
4) Now it’s time to add your signers. From the Package page, click ‘Add Signers’. You have the option of adding signers from your own organization through Active Directory, a New User who would be external to your organization, or a group of people through the Mapping List option. For this example, we’ll add a new signer by entering their email address, first name and last name. Click ‘Save’.
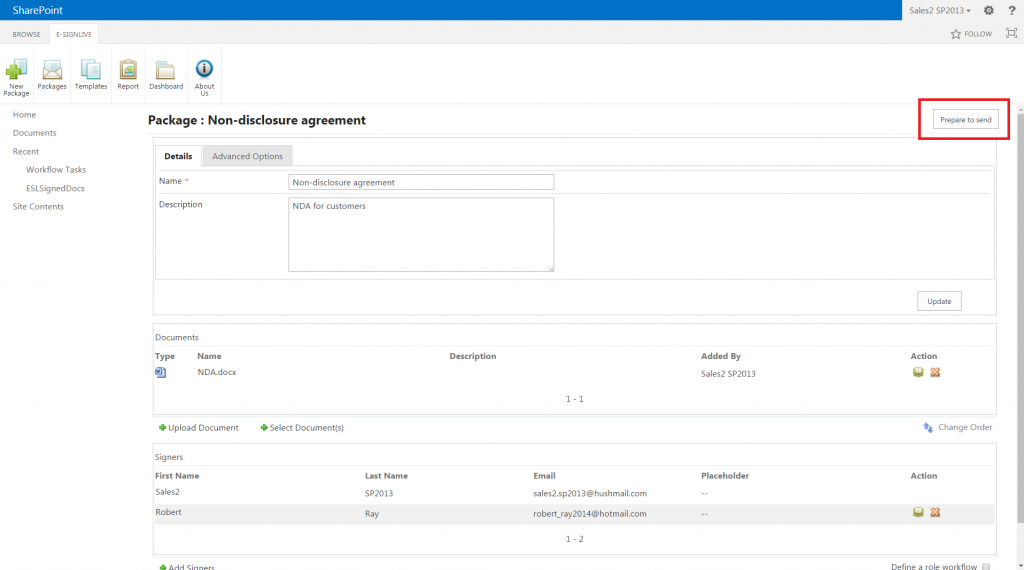
5) Your documents and signers have been added to the package. Now it’s time to prepare the document for e-signature. Click the ‘Prepare to send’ button. You will be directed to the ‘Designer View’.
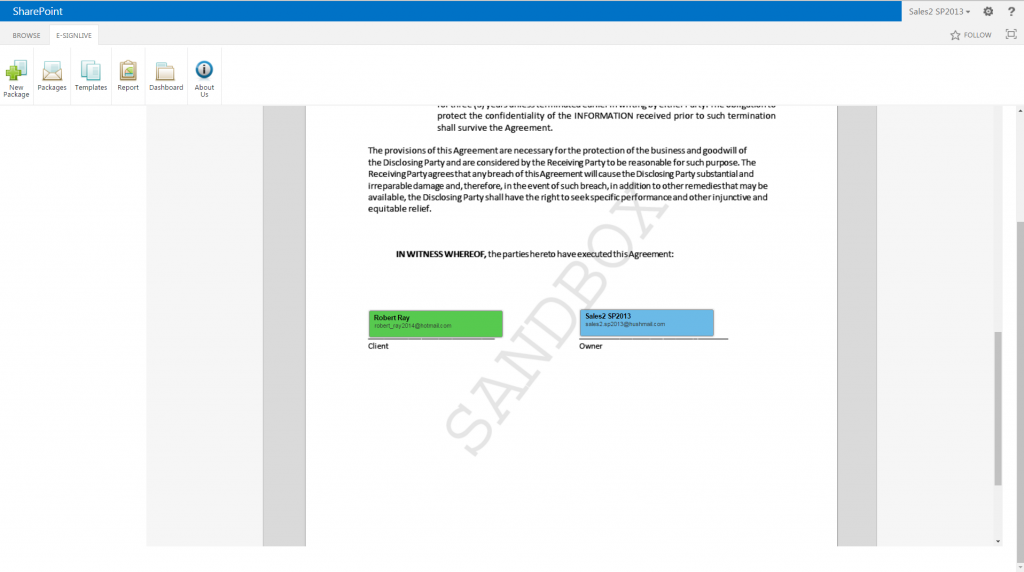
6) Drag and drop the signature blocks to the desired locations in the document. Click ‘Send’.

FAQ Questions
Is OneSpan Sign for Microsoft SharePoint included with my OneSpan Sign account?
Yes! OneSpan Sign for Microsoft SharePoint is available to all OneSpan Sign customers at no additional cost. All you need is an OneSpan Sign account and a Microsoft SharePoint account.
Where can I download OneSpan Sign for Microsoft SharePoint?
You can download OneSpan Sign for Microsoft SharePoint from our website.
When I send a document for e-signature from Microsoft SharePoint, will the e-signed transactions along with the Evidence Summary be archived in SharePoint?
When I send a document for e-signature from Microsoft SharePoint, will the e-signed transactions along with the Evidence Summary be archived in SharePoint?
Can I use templates for my frequently used documents I send out for e-signature in Microsoft SharePoint?
Yes! You can use templates for your frequently used documents for e-signature from Microsoft SharePoint from the ‘Templates’ object in SharePoint.
Can I use OneSpan Sign with SharePoint Nintex?
Yes! The OneSpan Sign for Nintex SharePoint connector makes it easy to add configurable drag-and-drop e-signature actions to new and existing workflow designs, allowing you to build paperless workflows that fit your business process needs.
OneSpan Sign for Box
Securely send documents for e-signature directly from Box
Step-by-step Instructions
Installation of OneSpan Sign for Box
1) Login to Box with your personal account credentials
2) In the Box menu bar, click your ‘User Name’, then click ‘Apps’.
3) Search for ‘OneSpan Sign’ using the Search Applications search bar found at the top of the page.
4) Select ‘OneSpan Sign for Box’, then click ‘+Add’.
5) A confirmation dialog box will open, click ‘Add’ to confirm. The OneSpan Sign for Box app is now installed on your Box account and is ready to use.
Using OneSpan Sign for Box
6) Upload your documents to Box (Box supports the following document formats: .pdf, .doc, .docx, or .odt). Select ‘Upload’, and click ‘Upload Files’ to upload a file to your Box account
7) Right click on the file you want to send for signing, and click ‘More Actions’. In the menu, select ‘Send with OneSpan Sign’. A permission dialog box will open. Click ‘Ok’ to allow Box to open your document with OneSpan Sign.
8) From here, you can add your signers to the document by clicking ‘Add Signer’. An ‘Add Signer’ dialog box will open. Enter the signer’s Email, First Name and Last Name. Click ‘Save’ to add the signer.
9) Drag and drop required signature boxes in the document to indicate where your signers need to sign.
10) Click ‘Send’. Once your documents are signed, they’re stored automatically in Box.
FAQ Questions
Is OneSpan Sign for Box included with my OneSpan Sign account?
Yes! OneSpan Sign for Box is available to all OneSpan Sign customers at no additional cost. All you need is an OneSpan Sign account and a Box account.
Where can I download OneSpan Sign for Box?
You can download OneSpan Sign for Box from the Box app marketplace.
Do I need a paid Box account to use OneSpan Sign for Box?
OneSpan Sign for Box can be used with both paid and free Box accounts.
Do I have to use the same email address for OneSpan Sign and Box to use the app?
Your OneSpan Sign account email address must be the same email address as your Box account.
Where can I find the e-signed documents after the transaction is complete?
You will find our e-signed document in the same folder in Box where the document originated.
Which document formats can I send for e-signature using OneSpan Sign for Box?
OneSpan Sign for Box supports the following document formats: .pdf, .doc, .docx and .odt.
Is OneSpan Sign for Box available for all OneSpan Sign environments?
Additional Resources
- Products: OneSpan Sign for Box
- Box App Marketplace: OneSpan Sign for Box Download (US)
- Box App Marketplace: OneSpan Sign for Box Download (Canada)
- Blog Post: How to get started with OneSpan Sign e-Signatures for Box
- Documentation: OneSpan Sign for Box – User’s Guide
- Documentation: OneSpan Sign for Box – Deployment Guide