OneSpan Sign Developer: Session, Authentication Token, and Signing Url – Part2
In the first part of this blog series, we covered different lifecycles and duties of session and authentication tokens, and we discussed the three factors that make a signing URL different from the one generated by the authentication token. By now, you are already able to select a solution to generate URL for your signing ceremony.
Therefore, we will mainly focus on the coding level concerns of these three concepts and the rest of the details that may interest you.
Single Use and Multiple Use Authentication Tokens
There are two types of authentication tokens: single use and multiple use. A URL with a single use token can only allow the signer to get access to signing ceremony once. If the signer refreshes or closes the page or the parent window redirects the URL, they can’t return to the signing ceremony using the same link.
Multiple use token literally means signers can come back to the signing ceremony at any time as long as the token is not expired. They can use the same token multiple times.
Both the single use and multiple use tokens have their place. Choosing between them depends on your own unique requirements.
The codes below codes demonstrate how you can retrieve an authentication token for a specific signer using either SDK and API methods:
Java SDK:
String signerAuthToken = eslClient.getAuthenticationTokensService().createSignerAuthenticationToken(new PackageId(packageId), signerId); //multiple use authentication token
String singleUseToken = eslClient.getAuthenticationTokensService().createSignerAuthenticationTokenForSingleUse(packageId, signerId, null); //single use authentication token
.Net SDK:
string signerAuthToken = eslClient.AuthenticationTokenService.CreateSignerAuthenticationToken(new PackageId(packageId), signerId); //multiple use authentication token
string singleUseToken = eslClient.AuthenticationTokensService.CreateSignerAuthenticationTokenForSingleUse(packageId, signerId, signerSessionFields); //single use authentication token
REST API
HTTP Request
POST /api/authenticationTokens/signer/multiUse		// for multiple use
POST /api/authenticationTokens/signer/singleUse		// for single use
HTTP Headers
Accept: application/json
Content-Type: application/json
Authorization: Basic api_key
Request Payload
{
    "packageId": "5vjLRY5MWrDJ6MzRAEyCKOy5IH0=",
    "signerId": "8b734331-bc5b-4843-9784-d4ece4b7dc22"
}
Response Payload
{
   "packageId":"5vjLRY5MWrDJ6MzRAEyCKOy5IH0=",
   "signerId":"8b734331-bc5b-4843-9784-d4ece4b7dc22",
   "value":"ZDNmMDNiNGUtNGYxOC00YWZiLTkwMmUtNWE5YmIwZTRjZDg1"
}
Each of these methods will yield a token, such as the one below, that is composed of upper case and lower case letters as well as numbers.
NDlkZjEyOWYtODFmYy00NDI2LWJhNDYtZTVjMmE3ZGI1YjEy
It’s combined with Upper case, Lower case and Number.
Note:
1. Signer ID in this SDK/API call can be replaced by signer’s Email.
2. Authentication Token can only be generated when the package is in “SENT” or “COMPLETED” status.
3. If you modified your signer’s email in your workflow, you will need to generate a new authentication token, because their email will also be validated when accessing the signing ceremony. If this validation fails, the signer will be redirected to a page that looks like the screenshot below: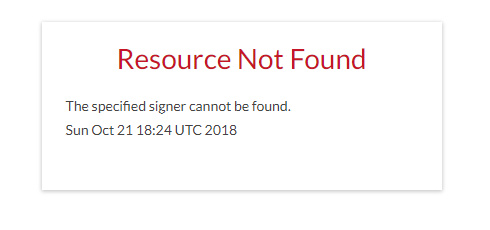
After retrieving the authentication token, you can obtain a signing session by building the following URL:
https://sandbox.esignlive.com/access?sessionToken={signerAuthToken}
Signing Url
In Java SDK, you can generate a signing URL directly by using this function:
String signingUrl = eslClient.getPackageService().getSigningUrl(new PackageId("package id"), “signer Id”); // in this case, signer id can't be replaced by email
And in .Net SDK:
string signingUrl = eslClient.PackageService.GetSigningUrl(new PackageId("package id"), "signer id"); // in this case, signer id can't be replaced by email
When using an SDK to generate the signing URL, OneSpan Sign prompts you to use the signer ID instead of email or Role ID. So, when building a signer object, a withCustomId() function to synchronize Role ID and Signer ID is strongly recommended.
HTTP Request
GET /api/packages/{packageId}/roles/{roleId}/signingUrl
HTTP Headers
Accept: application/json
Content-Type: application/json
Authorization: Basic api_key
Response Payload
{
  "roleId": "2jsTTXD2dZMZ",
  "url": "https://sandbox.e-signlive.com/auth?target=https%3A%2F%2Fsandbox.esignlive.com\r\n%2Fpackages%2FnaXQwWFSQB9RkOiH6AguBCkXp2k=%2Fsign&loginToken=\r\nMi4xMDAwGpGY3JJPS55ZnNSeHBmekNxc1RzdnNJRVlBSDkZBR1RhcmxKS09aZ3M4aFZXVlpvdExrdz09",
  "packageId": "a3b023bf-db56-4c53-b36e-bd9acd0579f4"
}
In Rest
This differs from the SDK because, this requires a Role ID instead of a Signer ID.
Note:
Similar to the authentication token, the signing URL is bound to a specific email. If you change your signer’s email, make sure you rerun the function and build a new signing URL.
Through this blog, we’ve demonstrated how to programmatically retrieve an authentication token and signing URL. Together with part one of this blog, you can have more flexibility in your choices when developing authentication tokens.
If you have any questions regarding this blog or anything else concerning integrating OneSpan Sign into your application, visit the Developer Community Forums. Your feedback matters to us!