OneSpan Sign Developer: Creating a Notarized Package – Part 3

In Part 1 of this blog series, we covered the fundamental steps necessary to make use of the eNotary system. Then in Part 2, we focused on bet practices to follow when integrating eNotary into your application.
Now, in Part 3 of this ongoing blog series, we will include a working example of the tool in C# to showcase how to create a notarized package and then generate the signing link programmatically.
Below, we’ve included a screenshot of the notarized document embedded in an iFrame. By following these instructions, you will be able to do the same within your OneSpan Sign deployment. 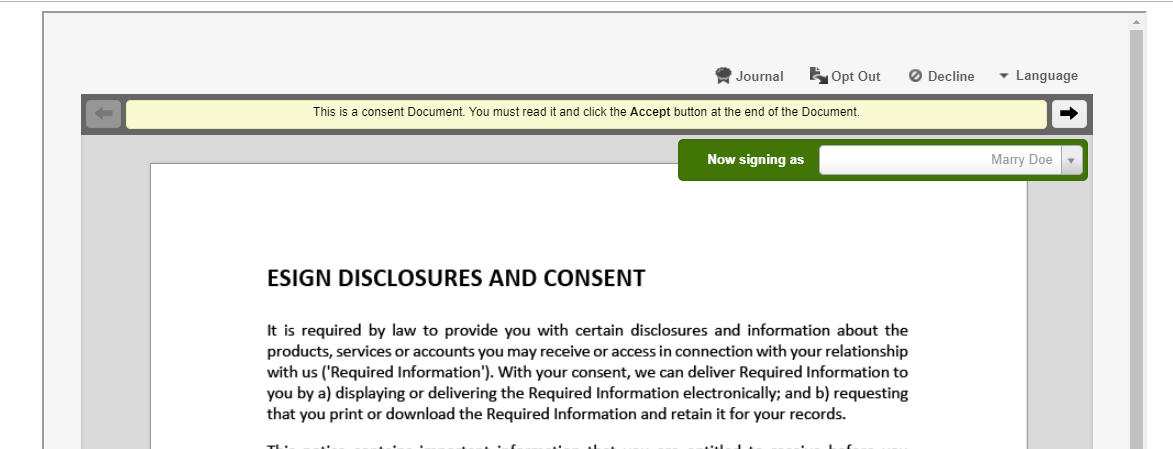
Create a Notarized Package
The first step in this two-step workflow involves creating a notarized package by combining SDK and REST methods. You can download the complete code here.
Step1:
The first thing you want to do is to add signers, upload documents, add signatures and fields for non-notary signers, and trigger the notarized setting during package creation using the SDK functions below.
                DocumentPackage pkg1 = PackageBuilder.NewPackageNamed("Create Notary Package by .NET SDK - " + System.DateTime.Now)
                                                               .WithSigner(SignerBuilder.NewSignerWithEmail(notaryEmail)
                                                                       .WithFirstName("Duo")
                                                                       .WithLastName("Liang")
                                                                       .WithCustomId(notaryRoleId)
                                                                       )
                                                               .WithSigner(SignerBuilder.NewSignerWithEmail(signerEmail)
                                                                       .WithFirstName("Marry")
                                                                       .WithLastName("Doe")
                                                                       .WithCustomId("applicant")
                                                                       )
                                                               .WithDocument(DocumentBuilder.NewDocumentNamed("document 1")
                                                                       .FromFile("P:\\Documents\\sample_contract.pdf")
                                                                       .WithId(notaryDocumentId)
                                                                       .WithSignature(SignatureBuilder.SignatureFor(signerEmail).AtPosition(100,100)
                                                                            .WithField(FieldBuilder.SignatureDate().AtPosition(100,200)))
                                                                       )
                                                               .WithNotarized(true)
                                                               .Build();

                PackageId createPackageOneStep = eslClient.CreatePackageOneStep(pkg1);
                Debug.WriteLine("package id: "+ createPackageOneStep);
Step2:
Once you have built the DocumentPackage object, set the notary Role ID using the REST method.
        private void setNotaryRoleId(String packageId, String notaryId) {
            HttpClient httpClient = new HttpClient();
            httpClient.DefaultRequestHeaders.Authorization = new AuthenticationHeaderValue("Basic", API_KEY);
            httpClient.DefaultRequestHeaders.Add("Accept", "application/json");
            string updatePackageString = "{\"notaryRoleId\" : \"" + notaryId + "\"}";
            StringContent jsonUpdatePackageContent = new StringContent(updatePackageString, Encoding.UTF8, "application/json");

            var response = httpClient.PutAsync(new Uri(API_URL) + "/packages/" + packageId, jsonUpdatePackageContent).Result;
            if (!response.IsSuccessStatusCode)
            {
                throw new Exception(response.Content.ReadAsStringAsync().Result);
            }
        }
    }
Step3:
Finally, add signatures and notary fields for the notary role. From there, you are ready to send your package.
                Signature notarySignature = SignatureBuilder.SignatureFor(notaryEmail)
                         .AtPosition(400, 100)
                         .WithField(FieldBuilder.CustomField("NotaryLicenseExpiryDate")
                             .WithStyle(FieldStyle.UNBOUND_CUSTOM_FIELD)
                             .AtPosition(400,200)
                             )
                          .WithField(FieldBuilder.CustomField("NotaryName")
                             .WithStyle(FieldStyle.SEAL)
                             .AtPosition(400, 300)
                          )
                         .Build();
                eslClient.ApprovalService.AddApproval(eslClient.GetPackage(createPackageOneStep), notaryDocumentId, notarySignature);
Note that there are two types of notary fields: “Regular” and “Seal”. For example, see the notary jurisdiction code below in the JSON format of a regular notary field:
{
                    "id": "NotaryJurisdiction",
                    "translations": [
                        {
                            "description": "NotaryJurisdiction",
                            "language": "en",
                            "id": "",
                            "data": null,
                            "name": "NotaryJurisdiction"
                        }
                    ],
                    "data": null,
                    "category": "NOTARY",
                    "type": "REGULAR",
                    "value": "Montreal",
                    "name": ""
                }
The corresponding C# code can be represented as:
                         .WithField(FieldBuilder.CustomField("NotaryLicenseExpiryDate")
                             .WithStyle(FieldStyle.UNBOUND_CUSTOM_FIELD)
                             .AtPosition(400,200)
                             )
Similarly, for a Seal notary field JSON like below:
                {
                    "id": "STAMP",
                    "translations": [
                        {
                            "description": "STAMP",
                            "language": "en",
                            "id": "",
                            "data": null,
                            "name": "STAMP"
                        }
                    ],
                    "data": null,
                    "category": "NOTARY",
                    "type": "SEAL",
                    "value": "20190704Test1\\nTest2\\nTest3",
                    "name": ""
                }
The right way to code in action is:
                          .WithField(FieldBuilder.CustomField("NotaryName")
                             .WithStyle(FieldStyle.SEAL)
                             .AtPosition(400, 300)
                          )
Generate a Notarized Signing Link
As discussed in Part 2, notaries within your organization that have already acquired their API Keys can avoid the login process by using a sender token instead. Assuming that this is our use case and we want to embed the notarized signing into an iFrame, this section includes the necessary steps.
To generate a signing ceremony link, create a user token for your notary. This purpose can be achieved by following Steps 4–6.
Step 4:
Below is a sample custom code in REST method to generate Sender ID by Sender Email.
        private String getSenderIdByEmail(String senderEmail) {
            HttpClient httpClient = new HttpClient();
            httpClient.DefaultRequestHeaders.Authorization = new AuthenticationHeaderValue("Basic", API_KEY);
            httpClient.DefaultRequestHeaders.Add("Accept", "application/json");

            String url = new Uri(API_URL) + "/account/senders?search=" + senderEmail;
            var response = httpClient.GetAsync(url).Result;
            JObject responseJSON = JObject.Parse(response.Content.ReadAsStringAsync().Result);
            var senders = responseJSON["results"];

            foreach (var sender in senders)
            {
                if (sender["email"].ToString() ==senderEmail) {
                    return sender["id"].ToString() ;
                }
            }
            return null;
        }
Step 5:
Next, retrieve the API Key for this specific sender using the person’s Sender ID obtained in Step 4. This is possible, because the notary is also a sender under our main account in this particular scenario.
        private String getSenderApiKeyById(String senderId)
        {
            HttpClient httpClient = new HttpClient();
            httpClient.DefaultRequestHeaders.Authorization = new AuthenticationHeaderValue("Basic", API_KEY);
            httpClient.DefaultRequestHeaders.Add("Accept", "application/json");

            String url = new Uri(API_URL) + "/account/senders/" + senderId +"/apiKey";
            var response = httpClient.GetAsync(url).Result;
            JObject responseJSON = JObject.Parse(response.Content.ReadAsStringAsync().Result);
            return responseJSON["apiKey"].ToString();
        }
Step 6:
After the API Key, we can generate a temporary user token for this user and use it to authorize the notary signing ceremony.
                EslClient client2 = new EslClient(senderApiKey, API_URL);
                string notaryUserToken = client2.AuthenticationTokenService.CreateUserAuthenticationToken();
Step 7:
string signingLink = BASE_API_URL+"/auth?authenticationToken="+ notaryUserToken + "&target="+ BASE_API_URL + "/packages/"+ createPackageOneStep.Id+ "/sign?iframe=true";
Finally, build the notarized signing link below which relies on a user token instead of a web portal session token. It also specified the target page after logging in as a notary.
If you have any questions regarding this blog or anything else concerning integrating OneSpan Sign into your application, visit the Developer Community Forums. Your feedback matters to us!
Browse the Other Entries in this Blog series:
• Creating a Notarized Package – Part 1
• Creating a Notarized Package – Part 2
• Creating a Notarized Package – Part 4

OneSpan Developer Community
Join the OneSpan Developer Community! Forums, blogs, documentation, SDK downloads, and more.
Join Today