OneSpan Sign Developer: Creating a Notarized Package – Part 2

In the first part of this blog series, we provided foundational information on how to make use of the eNotary system. From there, we can focus on how to integrate with the solution with a notarized signing scenario.
Embed Notarized Signing into an iFrame
To perform notary signing, log onto the OneSpan Sign web portal. From there, you can start the signing session. However, notaries within your organization that have already acquired their API Keys can avoid the login process by using a sender token instead. In this case, notarized signing can also be embedded into an iFrame, which provides a better white-labelled experience for your integrated application.
Note:
- The steps below only work when ALL notaries in your workflow are within your organization’s main account.
1. Generate a user token for your notary. This step is used to obtain a web portal access token instead of through the login process.
Java SDK:
String userAuthToken = eslClient.getAuthenticationTokensService().createUserAuthenticationToken();
.NET SDK:
string userAuthToken = eslClient.AuthenticationTokenService.CreateUserAuthenticationToken();
API Method:
HTTP Request
POST /api/authenticationTokens/user
HTTP Headers
Accept: application/json
Authorization: Basic api_key
Response Payload
{
   "value": "MjY0MjQ4MzgtMTJlOS00MzhjLTgzODMtMzJmMGNiZTg3ODBl"
}
2. Use the link template below, replacing information with your own data.
{instance_url}/auth?authenticationToken={user_token}&target={instance_url}/packages/{package_id}/sign?iframe=true
This example link above used a user token in exchange for a web portal session token. Then it specified the target page after logging in as a notary, and formatted this transaction to fit into an iFrame page as well.
Note:
- The instance URL doesn’t include “/api” part, for example: “https://sandbox.esignlive.com”.
- This link can either be opened in a new window tab or be embedded into an iFrame.
Notarized Signing as a Recipient
All signers must be in the physical presence of a notary when signing. So, signers will still receive separate email notifications remotely leading them to a preview signing ceremony room. There, all documents will be in read-only mode and signers cannot accept or sign the documents.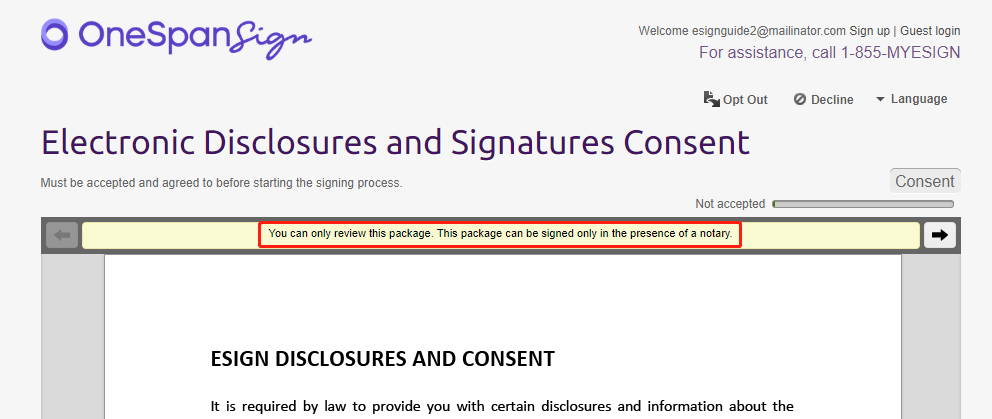
A message will be displayed in toolbar that reads “You can only review this package. This package can be signed only in the presence of a notary”.
However, the functions below will still be available in this review:
- The Language button
- The Decline / Opt Out button
- The Reassign Recipient button
- The Download button
You can hide these buttons in the package level settings. To learn how to setup these functions, refer to Signing Ceremony Customization guide.
Best Practice Tip
In a OneSpan Sign Signing Ceremony implementation, default consent prevents some buttons from displaying, including Download and Reassign Signer buttons. Considering that signers can’t bypass default-consent in review signing ceremony, it’s better to use Accept-Only documents in your notarized package to give recipients access to these functionalities. 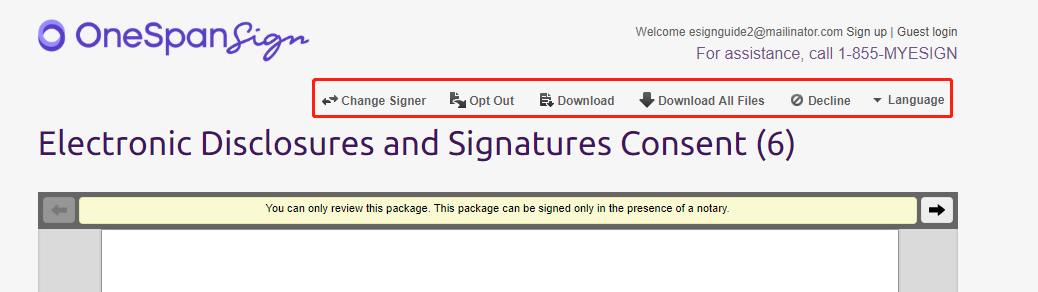
Compared to the screenshot above, supported buttons are now all available.
Disable In-person Activation Email
If you don’t want your recipients to receive this review email, there is a back office setting to disable in-person activation emails. Contact our support team to have this set up at your account level.
Note:
By enabling this setting, remote activation notifications will also be removed for in-person signing recipients. This forced the user to sign-in a same device.
If you have any questions regarding this blog or anything else concerning integrating OneSpan Sign into your application, visit the Developer Community Forums. Your feedback matters to us!
Browse the Other Entries in this Blog series:
• Creating a Notarized Package – Part 1
• Creating a Notarized Package – Part 3
• Creating a Notarized Package – Part 4

OneSpan Developer Community
Join the OneSpan Developer Community! Forums, blogs, documentation, SDK downloads, and more.
Join Today