OneSpan Sign How To: Creating Custom Fields

OneSpan Sign’s custom fields feature automatically populates a field with specific data after the signer has signed the document. For instance, one of your signers may have an employee or policy number that you may want to appear on the final document. By using a custom field, you can auto-populate data that suits your needs. In this blog, I will show you how to create, retrieve, delete, and apply custom fields on your document with the OneSpan Sign Java SDK, .NET SDK, and REST API.
Custom Fields In the UI
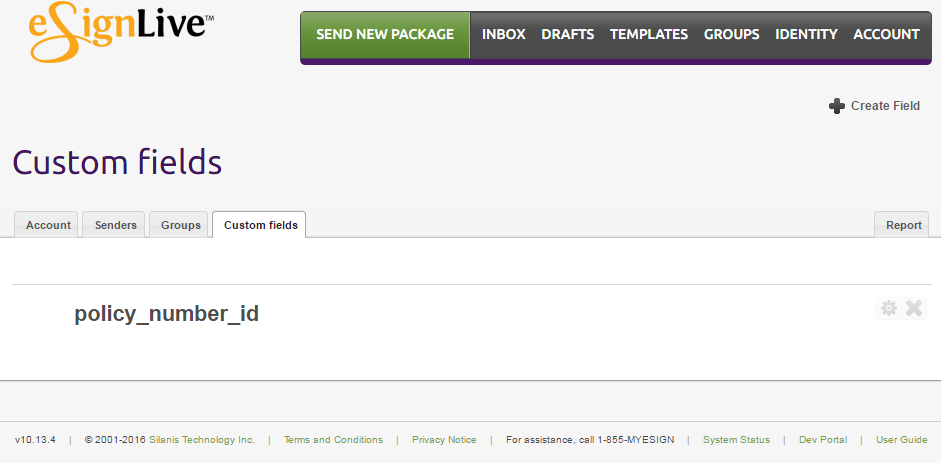
The first thing you want to do is locate your custom fields in the UI. After logging into your OneSpan Sign account, click on "ACCOUNT" in the toolbar and then select the custom fields tab. After running your code, you will find all of your custom fields here, as shown in the Running Your Code section below. You can always create your custom fields straight from the UI if that’s what you wish and skip the creation portion of the technology you are using, below. If you’re unable to see custom fields in your account, they are likely not enabled. Please contact our support team at [email protected] to have it enabled.
The Code
You can go ahead and skip to the section which applies to your method. I will cover the same content in each segment. Complete example code for this blog can be found in the Developer Community Code Share: Java, .NET, and REST.

OneSpan Developer Community
Join the OneSpan Developer Community! Forums, blogs, documentation, SDK downloads, and more.
Join TodayJava SDK First, I will start with the Java SDK. To create a custom field, you will need to build a CustomField object. Every custom field you create is identified by the unique id you set. If you create another custom field with the same id through the SDK, it will be overwritten with the latest one. Also, it is important to note that every custom field you create is done so for the entire account. In the other words, your senders will able to use your custom fields.
The withDefaultValue() is the value that appears after your signer has signed the document. This method is required when creating a custom field. The custom field also contains a collection of translations which are used when displaying the custom field to the account members in the identity page, which can be found by logging into OneSpan Sign and selecting "IDENTITY" in the toolbar. At least one translation is required when building your CustomField object. Then, you call on your OneSpan Sign CustomFieldService to create your custom field.
String customFieldId1 = "policy_number_id";
CustomField customField = CustomFieldBuilder.customFieldWithId(customFieldId1)
.withDefaultValue("123-456-789-0")
        	.withTranslation(newTranslation("en")
       		.withName("Policy Number")
                .withDescription("Car Insurance Policy Number."))
      	.build();

eslClient.getCustomFieldService().createCustomField(customField);
You can retrieve your custom fields with the OneSpan Sign CustomFieldService. You can either retrieve all your custom fields, which are returned to you as a list, or retrieve a specific one using the custom field id.
// Get the entire list of custom field from account
List<CustomField> retrieveCustomFieldList1 = eslClient.getCustomFieldService().getCustomFields(Direction.ASCENDING);

// Get the first custom field from account
CustomField retrieveCustomField = eslClient.getCustomFieldService().getCustomField(customFieldId1);
Deleting a custom field from your account is also done with OneSpan Sign CustomFieldService.
// Delete the second custom field from account
eslClient.getCustomFieldService().deleteCustomField(customFieldId1);
Finally, here’s how you would edit your signature block to add custom fields on your document. In my example, I used text anchors to position my signature and custom fields. You can find more about text anchors, here. If you need a comparison to the basic document object creation or if this is your first time creating a package with the Java SDK, see this blog.
.withSignature(signatureFor(email1)
.withPositionAnchor(TextAnchorBuilder.newTextAnchor("Client Signature")
       		.atPosition(TextAnchorPosition.TOPLEFT)
                	.withOccurence(0)
             	.withCharacter(16)
     		.withSize(250, 70)
            	.withOffset(20, -58))
        	.withField(FieldBuilder.customField(customField.getId())
              	.withPositionAnchor(TextAnchorBuilder.newTextAnchor("Policy Number")
                		.atPosition(TextAnchorPosition.TOPLEFT)
                       	.withOccurence(0)
                        	.withCharacter(13)
                  	.withSize(250, 25)
                      	.withOffset(20, -10))))
.NET SDK Next, I will cover the .NET SDK. To create a custom field, you will need to build a CustomField object. Every custom field you create is identified by the unique id you set. If you create another custom field with the same id through the SDK, it will be overwritten with the latest one. Also, it is important to note that every custom field you create is done so for the entire account. In the other words, your senders will able to use your custom fields.
The withDefaultValue() is the value that appear after your signer has signed the document. This method is required when creating a custom field. The custom field also contains a collection of translations which are used when displaying the custom field to the account members in the identity page, which can be found by logging into OneSpan Sign and selecting "IDENTITY" in the toolbar. At least one translation is required when building your CustomField object. Then, you call on your OneSpan Sign CustomFieldService to create your custom field.
String customFieldId1 = "policy_number_id";
CustomField customField = CustomFieldBuilder.CustomFieldWithId(customFieldId1)
            	.WithDefaultValue("123-456-789-0")
                	.WithTranslation(TranslationBuilder.NewTranslation("en")
              		.WithName("Policy Number")
            		.WithDescription("Car Insurance Policy Number."))
              	.Build();

eslClient.GetCustomFieldService().CreateCustomField(customField);
You can retrieve your custom fields with the OneSpan Sign CustomFieldService. You can choose to either retrieve all your custom fields, which are returned to you as a list, or retrieve a specific one using the custom field id.
// Get the entire list of custom field from account
IList<CustomField> retrieveCustomFieldList1 = eslClient.GetCustomFieldService().GetCustomFields(Direction.ASCENDING);

// Get the first custom field from account
CustomField retrieveCustomField = eslClient.GetCustomFieldService().GetCustomField(customFieldId1);
Deleting a custom field from your account is also done with OneSpan Sign CustomFieldService.
// Delete the second custom field from account
eslClient.GetCustomFieldService().DeleteCustomField(customFieldId1);
Finally, here’s how you would edit your signature block to add custom fields on your document. In my example, I used text anchors to position my signature and custom fields. You can find more about text anchors, here. If you need a comparison to the basic document object creation or if this is your first time creating a package with the .NET SDK, see this blog.
.WithSignature(SignatureBuilder.SignatureFor(email1)
.WithPositionAnchor(TextAnchorBuilder.NewTextAnchor("Client Signature")
.AtPosition(TextAnchorPosition.TOPLEFT)
             	.WithOccurrence(0)
             	.WithCharacter(16)
        	.WithSize(250, 70)
           	.WithOffset(20, -58))
.WithField(FieldBuilder.CustomField(customField.Id)
.WithPositionAnchor(TextAnchorBuilder.NewTextAnchor("Policy Number")
.AtPosition(TextAnchorPosition.TOPLEFT)
                    	.WithOccurrence(0)
                    	.WithCharacter(13)
                   	.WithSize(250, 25)
                   	.WithOffset(20, -10))))
REST API Finally, I will go over the REST API. To create a custom field, you will need to build the JSON below and make a POST request to https://sandbox.e-signlive.com/api/account/customfields. Every custom field you create is identified by the unique id you set. If you create another custom field with the same id through the API, it will be overwritten with the latest one. Also, it is important to note that every custom field you create is done so for the entire account. In the other words, your senders will able to use your custom fields.
In the JSON below, the "value" object is the value that appear after your signer has signed the document. This field is required when creating a custom field. The custom field also contains a collection of translations which are used when displaying the custom field to the account members in the identity page, which can be found by logging into OneSpan Sign and selecting "IDENTITY" in the toolbar. At least one translation is required when building your JSON.
[code language="javascript"]{ "id":"policy_number_id", "value":"123-456-789-0", "required":false, "translations":[ { "language":"en", "name":"Policy Number", "description":"Car Insurance Policy Number." } ] }
You can also retrieve your custom fields. You can either retrieve all your custom fields by making a GET request to https://sandbox.e-signlive.com/api/account/customfields, or retrieve a specific one using the custom field id, https://sandbox.e-signlive.com/api/account/customfields/{customFieldId}. Deleting a custom field from your account is done by making a DELETE request to https://sandbox.e-signlive.com/api/account/customfields/{customFieldId}.
Finally, here’s how you would edit your "approvals" object to add custom fields on your document. In my example, I used text anchors to position my signature and custom fields. You can find more about text anchors, here. If you need a comparison to the basic document object creation or if this is your first time creating a package with the REST API, see this blog. [code language="javascript"]"approvals": [ { "fields": [ { "type": "SIGNATURE", "extract": true, "extractAnchor": { "text": "Client Signature", "index": 0, "width": 250, "height": 70, "anchorPoint": "TOPLEFT", "characterIndex": 16, "leftOffset": 20, "topOffset": -58 }, "subtype": "FULLNAME" }, { "type": "INPUT", "extract": true, "extractAnchor": { "text": "Policy Number", "index": 0, "width": 250, "height": 25, "anchorPoint": "TOPLEFT", "characterIndex": 13, "leftOffset": 20, "topOffset": -10 }, "subtype": "CUSTOMFIELD", "name": "policy_number_id" } ], "role": "Signer1" }, { "fields": [ { "type": "SIGNATURE", "extract": true, "extractAnchor": { "text": "Manager Signature", "width": 250, "height": 70, "index": 0, "anchorPoint": "TOPLEFT", "characterIndex": 17, "leftOffset": 20, "topOffset": -58 }, "subtype": "FULLNAME" }, { "type": "INPUT", "top": 50, "left": 50, "height": 50, "width": 250, "subtype": "CUSTOMFIELD", "name": "agent_number_id" } ], "role": "Signer2" }
Running Your Code
You can now go ahead and run your code. Once you’ve done this, you will find your newly created custom fields in your OneSpan Sign account as described at the beginning in the Custom Fields In the UI segment.
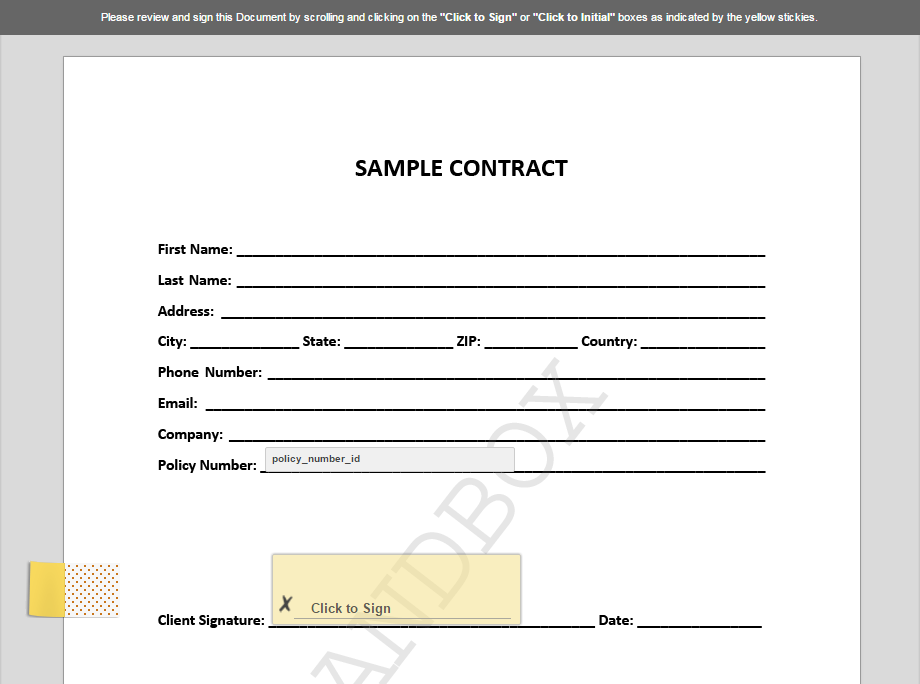
Furthermore, once you’ve applied your custom field(s) on your document and sent your package, your signer(s) will see the following:
If you have questions regarding this blog or anything else concerning integrating OneSpan Sign into your application, visit the developer community forums: https://developer.onespan.com. That's it from me. Thank you for reading! If you found this post helpful, please share it on Facebook, Twitter, or LinkedIn.