OneSpan Sign for New Users: Create and Send a Package using REST with Java

When I first started with OneSpan Sign, I started a blog series called “OneSpan Sign for New Users”. I covered simple examples of using the OneSpan Sign UI, Java SDK, .NET SDK, and the REST API with C#. There have been several questions about using REST with Java instead, so I decided to team up with Haris (our new Junior OneSpan Sign Evangelist). I’ll be doing the first of two more blogs in the series. Mine will cover creating and sending a document package while Haris will follow up with checking the package status and downloading the documents from the package.
If you do not have a Sandbox account, see my first blog for how you can get signed up.
Configuration
Before you can get started, you will need to set up your environment. For this example, I will be using Java and Eclipse. Go ahead and create a new project and .java file. I named my project “CreateAndSendPackageREST” and my .java file, “CreateAndSendPackageREST.java”. If you need help getting this set up, see my first .Java SDK blog for more detailed instructions on setting up a project.
Create and Send a Package using REST with Java
The Code
Since the environment setup and project configuration has been covered in previous blogs, in this series, I will jump right into the code. Open the .java file you created above and copy in the following code. I will cover the code in more detail below.

OneSpan Developer Community
Join the OneSpan Developer Community! Forums, blogs, documentation, SDK downloads, and more.
Join Today
package com.esignlive.example;

import java.io.BufferedReader;
import java.io.File;
import java.io.IOException;
import java.io.InputStreamReader;
import java.io.OutputStream;
import java.io.OutputStreamWriter;
import java.io.PrintWriter;
import java.net.HttpURLConnection;
import java.net.MalformedURLException;
import java.net.URL;
import java.net.URLConnection;
import java.nio.file.Files;

public class SimpleCreateAndSendREST {


    public static void main(String[] args) throws MalformedURLException, IOException {

        String requestURL = "https://sandbox.esignlive.com/api";
        String apiKey = "Your_API_Key";
        String charset = "UTF-8";
        File uploadFile1 = new File("C:/Eclipse/workspace_442/CreateAndSendPackage/sampleAgreement.pdf");
        String boundary = Long.toHexString(System.currentTimeMillis()); // Generate a random value for the form boundary
        String CRLF = "\r\n"; // Line separator used in multipart/form-data.
        String jsonContent = "{\"roles\":[{\"locked\":false,\"emailMessage\":{\"content\":\"\"},\"attachmentRequirements\":[],\"reassign\":false,\"specialTypes\":[],\"id\":\"Sender\",\"data\":null,\"type\":\"SIGNER\",\"index\":0,\"signers\":[{\"auth\":{\"challenges\":[],\"scheme\":\"NONE\"},\"company\":\"Silanis\",\"firstName\":\"PreparerFirst\",\"lastName\":\"PreparerLast\",\"phone\":\"\",\"email\":\"[email protected]\",\"knowledgeBasedAuthentication\":null,\"language\":\"en\",\"title\":\"Silanis\",\"external\":null,\"professionalIdentityFields\":[],\"userCustomFields\":[],\"delivery\":{\"email\":true,\"provider\":false,\"download\":true},\"group\":null,\"signature\":null,\"address\":null,\"data\":null,\"name\":\"\",\"specialTypes\":[]}],\"name\":\"Sender\"},{\"locked\":false,\"emailMessage\":{\"content\":\"\"},\"attachmentRequirements\":[],\"reassign\":false,\"specialTypes\":[],\"id\":\"Signer\",\"data\":null,\"type\":\"SIGNER\",\"index\":0,\"signers\":[{\"auth\":{\"challenges\":[],\"scheme\":\"NONE\"},\"company\":\"\",\"firstName\":\"SignerFirst\",\"SignerLast\":\"Silanis\",\"phone\":\"\",\"email\":\"[email protected]\",\"knowledgeBasedAuthentication\":null,\"language\":\"en\",\"title\":\"\",\"external\":null,\"professionalIdentityFields\":[],\"userCustomFields\":[],\"delivery\":{\"email\":false,\"provider\":false,\"download\":false},\"group\":null,\"id\":\"Signer\",\"signature\":null,\"address\":null,\"data\":null,\"name\":\"\",\"specialTypes\":[]}],\"name\":\"Signer\"}],\"documents\": [{\"approvals\":[{\"role\":\"Signer\",\"signed\":null,\"accepted\":null,\"data\":null,\"fields\":[{\"page\":0,\"subtype\":\"FULLNAME\",\"width\":200,\"binding\":null,\"extract\":false,\"extractAnchor\":null,\"left\":175,\"top\":165,\"validation\":null,\"height\":50,\"data\":null,\"type\":\"SIGNATURE\",\"value\":\"\"}],\"name\":\"\"},{\"role\":\"Sender\",\"signed\":null,\"accepted\":null,\"data\":null,\"fields\":[{\"page\":0,\"subtype\":\"FULLNAME\",\"width\":200,\"binding\":null,\"extract\":false,\"extractAnchor\":null,\"left\":550,\"top\":165,\"validation\":null,\"height\":50,\"data\":null,\"type\":\"SIGNATURE\",\"value\":\"\"}],\"name\":\"\"}],\"name\": \"sampleAgreement\"}],\"name\": \"Test Package REST\", \"type\":\"PACKAGE\", \"language\":\"en\", \"emailMessage\":\"\", \"description\":\"New Package\",\"autoComplete\":true,\"status\":\"SENT\"}";

        URLConnection connection = new URL(requestURL + "/packages/").openConnection();
        connection.setDoOutput(true);
        connection.setRequestProperty("Content-Type", "multipart/form-data; boundary=" + boundary);
        connection.setRequestProperty("Authorization", "Basic " + apiKey);
    connection.setRequestProperty("Accept", "application/json");
    OutputStream output = connection.getOutputStream();
    PrintWriter writer = new PrintWriter(new OutputStreamWriter(output, charset), true);

        try  {

             // Add pdf file.
             writer.append("--" + boundary).append(CRLF);
             writer.append("Content-Disposition: form-data; name=\"file\"; filename=\"" + uploadFile1.getName() + "\"").append(CRLF);
             writer.append("Content-Type: " + URLConnection.guessContentTypeFromName(uploadFile1.getName())).append(CRLF);
             writer.append("Content-Transfer-Encoding: application/pdf").append(CRLF);
             writer.append(CRLF).flush();
             Files.copy(uploadFile1.toPath(), output);
             output.flush();
             writer.append(CRLF).flush();

             // add json payload
             writer.append("--" + boundary).append(CRLF);
             writer.append("Content-Disposition: form-data; name=\"payload\"").append(CRLF);
             writer.append("Content-Type: application/json; charset=" + charset).append(CRLF);
             writer.append(CRLF).append(jsonContent).append(CRLF).flush();

             // End of multipart/form-data.
             writer.append("--" + boundary + "--").append(CRLF).flush();
        }
        catch (IOException ex) {
            System.err.println(ex);
        }

        //get and write out response code
        int responseCode = ((HttpURLConnection) connection).getResponseCode();
        System.out.println(responseCode);

        //get and write out response
        BufferedReader in = new BufferedReader(new InputStreamReader(connection.getInputStream()));
    String inputLine;
    StringBuffer response = new StringBuffer();

    while ((inputLine = in.readLine()) != null) {
         response.append(inputLine);
    }
        in.close();

    //print result
    System.out.println(response.toString());
    }
}
Breaking down the Code
As this is a very simple example, everything is done in the main method.
In the first couple lines, the connection info for your OneSpan Sign connection is defined. If you’re using the production environment, use the url, https://apps.e-signlive.com/api. Make sure you replace the placeholder text with your API_KEY. You can find this value in the ACCOUNT page when signed into your OneSpan Sign Sandbox account. If you are using the production instance, you will have to contact support to get this key.
1 string apiKey = "YOUR_API_KEY";
2 string url = "https://sandbox.esignlive.com/api";
After that, you will see several other variables being set that we will use in the creation of the POST call, like the form boundary value and the file you plan to upload.
1 String charset = "UTF-8";
2 File uploadFile1 = new File("C:/Eclipse/workspace_442/CreateAndSendPackage/sampleAgreement.pdf");
3 String boundary = Long.toHexString(System.currentTimeMillis()); // Generate a random value for the form boundary
4 String CRLF = "\r\n"; // Line separator used in multipart/form-data
The next line is the JSON string that defines your package. Typically, you will probably build your JSON string dynamically vs having a giant static string, like this, but I did it this way to give a good representation of the structure of the JSON you will need to create your package properly. I have left many empty properties in the string that are not necessary for creation so you can see some of the other options that are available and how they are passed in the JSON. I have formatted the JSON for readablility, below.
string jsonString = "{
	\"roles\":[
	{
		\"locked\":false,
		\"emailMessage\":
		{
			\"content\":\"\"
		},
		\"attachmentRequirements\":[],
		\"reassign\":false,
		\"specialTypes\":[],
		\"id\":\"Sender\",
		\"data\":null,
		\"type\":\"SIGNER\",
		\"index\":0,
		\"signers\":[
		{
			\"auth\":
			{
				\"challenges\":[],
				\"scheme\":\"NONE\"
			},
			\"company\":\"Silanis\",
			\"firstName\":\"YOUR_FIRST_NAME\",
			\"lastName\":\"YOUR_LAST_NAME\",
			\"phone\":\"\",
			\"email\":\"[email protected]\",
			\"knowledgeBasedAuthentication\":null,
			\"language\":\"en\",
			\"title\":\"\",
			\"external\":null,
			\"professionalIdentityFields\":[],
			\"userCustomFields\":[],
			\"delivery\":
			{
				\"email\":true,
				\"provider\":false,
				\"download\":true
			},
			\"group\":null,
			\"signature\":null,
			\"address\":null,
			\"data\":null,
			\"name\":\"\",
			\"specialTypes\":[]
		}],
		\"name\":\"Sender\"
	},
	{
		\"locked\":false,
		\"emailMessage\":
		{
			\"content\":\"\"
		},
		\"attachmentRequirements\":[],
		\"reassign\":false,
		\"specialTypes\":[],
		\"id\":\"Signer\",
		\"data\":null,
		\"type\":\"SIGNER\",
		\"index\":0,
		\"signers\":[
		{
			\"auth\":
			{
				\"challenges\":[],
				\"scheme\":\"NONE\"
			},
			\"company\":\"\",
			\"firstName\":\"SIGNER_FIRST_NAME\",
			\"lastName\":\"SIGNER_LAST_NAME\",
			\"phone\":\"\",
			\"email\":\"[email protected]\",
			\"knowledgeBasedAuthentication\":null,
			\"language\":\"en\",
			\"title\":\"\",
			\"external\":null,
			\"professionalIdentityFields\":[],
			\"userCustomFields\":[],
			\"delivery\":
			{
				\"email\":false,
				\"provider\":false,
				\"download\":false
			},
			\"group\":null,
			\"id\":\"Signer\",
			\"signature\":null,
			\"address\":null,
			\"data\":null,
			\"name\":\"\",
			\"specialTypes\":[]
		}],
		\"name\":\"Signer\"
	}],
	\"documents\":[
	{
		\"approvals\":[
		{
			\"role\":\"Signer\",
			\"signed\":null,
			\"accepted\":null,
			\"data\":null,
			\"fields\":[
			{
				\"page\":0,
				\"subtype\":\"FULLNAME\",
				\"width\":200,
				\"binding\":null,
				\"extract\":false,
				\"extractAnchor\":null,
				\"left\":175,
				\"top\":165,
				\"validation\":null,
				\"height\":50,
				\"data\":null,
				\"type\":\"SIGNATURE\",
				\"value\":\"\"
			}],
			\"name\":\"\"
		},
		{
			\"role\":\"Sender\",
			\"signed\":null,
			\"accepted\":null,
			\"data\":null,
			\"fields\":[
			{
				\"page\":0,
				\"subtype\":\"FULLNAME\",
				\"width\":200,
				\"binding\":null,
				\"extract\":false,
				\"extractAnchor\":null,
				\"left\":550,
				\"top\":165,
				\"validation\":null,
				\"height\":50,
				\"data\":null,
				\"type\":\"SIGNATURE\",
				\"value\":\"\"
			}],
			\"name\":\"\"
		}],
		\"name\": \"YOUR_FILE_NAME\"
	}],
	\"name\": \"Test Package REST\",
	\"type\":\"PACKAGE\",
	\"language\":\"en\",
	\"emailMessage\":\"\",
	\"description\":\"New Package\",
	\"autoComplete\":true,
	\"status\":\"SENT\"
}";
The first part of the package JSON string is the “roles” object. Inside this, you can set items like the “id”, “company”, “first name”, “last name”, “email”, and “name” to customize your signer roles. Some of the other notable settings would be “email message”, “title”, and “delivery”.
The next section of the package JSON string is the “documents” object. Inside this, you will set items like the “name” and the “approvals” (signature blocks). In the “approvals”, the main items to set would be the “type”, “subtype”, “role”, “page”, and the location settings. These will define the signatures required in each document.
Finally, the last few settings of the package JSON string that you will want to note are the “name”, “type”, “status”, “emailMessage”, and “autoComplete”.
Next, you will define the connection on which you will send your request. The first line opens the connection to the request URL. Notice that the rest of the URL for the particular request that is being made is added to the base URL, here. The rest sets up the request properties and creates the OutputStream and PrintWriter for communicating the request payload with OneSpan Sign.
1 URLConnection connection = new URL(requestURL + "/packages/").openConnection();
2 connection.setDoOutput(true);
3 connection.setRequestProperty("Content-Type", "multipart/form-data; boundary=" + boundary);
4 connection.setRequestProperty("Authorization", "Basic " + apiKey);
5 connection.setRequestProperty("Accept", "application/json");
6 OutputStream output = connection.getOutputStream();
7 PrintWriter writer = new PrintWriter(new OutputStreamWriter(output, charset), true);
Inside the try block, the actual multipart form is created. Below, you can see how the boundary, form part descriptors, and content are added in each portion of the form.
// Add pdf file.
writer.append("--" + boundary).append(CRLF);
writer.append("Content-Disposition: form-data; name=\"file\"; filename=\"" + uploadFile1.getName() + "\"").append(CRLF);
writer.append("Content-Type: " + URLConnection.guessContentTypeFromName(uploadFile1.getName())).append(CRLF);
writer.append("Content-Transfer-Encoding: application/pdf").append(CRLF);
writer.append(CRLF).flush();
Files.copy(uploadFile1.toPath(), output);
output.flush();
writer.append(CRLF).flush();

// add json payload
writer.append("--" + boundary).append(CRLF);
writer.append("Content-Disposition: form-data; name=\"payload\"").append(CRLF);
writer.append("Content-Type: application/json; charset=" + charset).append(CRLF);
writer.append(CRLF).append(jsonContent).append(CRLF).flush();

// End of multipart/form-data.
writer.append("--" + boundary + "--").append(CRLF).flush();

// End of multipart/form-data.
writer.append("--" + boundary + "--").append(CRLF).flush();
Finally, you will make the POST call, passing your form to OneSpan Sign, creating your document package. In this example, I write the response code and response content out to the conole.
//get and write out response code
int responseCode = ((HttpURLConnection) connection).getResponseCode();
System.out.println(responseCode);

//get and write out response
BufferedReader in = new BufferedReader(new InputStreamReader(connection.getInputStream()));
String inputLine;
StringBuffer response = new StringBuffer();

while ((inputLine = in.readLine()) != null) {
    response.append(inputLine);
}
in.close();

//print result
System.out.println(response.toString());
If everything with your REST call is correct, you should get a package id returned as your response, like this one:

If you log in to your OneSpan Sign account, you can see the package has been created as defined in your request.
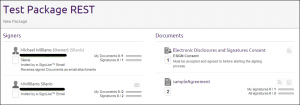
That is it. You have successfully created a new package, including a file, signers, and placing signature boxes using REST with Java.
If you have questions regarding this blog or anything else concerning integrating OneSpan Sign into your application, visit the developer community forums: https://developer.esignlive.com. That’s it from me. Thank you for reading! If you found this post helpful, please share it on Facebook, Twitter, or LinkedIn.
– Michael Williams